
The symptoms
I started to hear grumblings from the engine bay on my 2003 Toyota Celica VVTI 1.8…
Never a good sign…
It only happened after a long run and was not repeated every time, so i left it…
But it started to get more frequent, until it became every time….

And sitting in traffic, people would turn to look….
So with a sigh, you open the bonnet again and decide to track the source down…
Armed with a long screwdriver or socket extension bar you make sure there are no dangly bits to be caught in any moving parts of the engine….
Opening the bonnet, you wince at the sound of tortured metal….
You suspect it is a bearing running dry somewhere….
Standing at the front of the car you determine that it is loudest from your left.…
Where the serpentine belt is….
You look at the belt and pulleys and sigh…
Well it has been a good run, you have never changed it…so…..
Using your long screwdriver against the front of your ear you ‘listen’ to the individual parts….
And yes you hear the familiar rumbling of a dry bearing…it’s the tensioner pulley bearing….
It sounded like the aircon clutch, and still does, but lets try the tensioner first….
Should be a half hour job….( stop laughing if you have already done this…)
Why change the belt
The serpentine belt on these cars is very important…
Running most of the ancillaries on one belt…
If anything happens to it then you lose…
- Alternator
- water pump
- air con
- power steering…..
So not much…
If you do happen to snap one then don’t drive for more than a minute or the engine may overheat…
Will you know….with the power steering pump not working then you will know…
I had the power steering cooler pipe pop and lose all the fluid…you will know….
All of a sudden you feel the weight of the whole of the front of the car…and more….
So when do you have to check it and what is the replacement period….
Check it every 10k miles or so and definitely replace it every 50k miles…
When you replace it you may as well replace the tensioner as well….
Looks like an easy job ( i know some of you are chuckling right now….)
So I needed some parts…
Replacement Parts
To replace the belt and tensioner you need…
Yep you guessed it the belt and tensioner…
You can get just a pulley for the tensioner, i didn’t know why at this time…
And there is a special socket for the nut for the pulley…thanks Mr.T…
The belt, there is only one length for the facelift model….
Looking around on the net i was amazed…and still am…at the difference in pricing for the tensioner…
It varied between £30 and £120…just for the tensioner assembly….
The belt was around £14
I managed to pick up a kit of belt and tensioner from mister-auto for a reasonable price….
Factor in the delivery time of 8 days and you will be ok…think it will be with you by the weekend ( i hoped) and you will be disappointed and doing the work the next weekend…or evening…
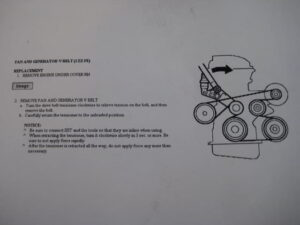
Before it arrives you can look at how to remove the belt and draw an image of how the serpentine belt is looped over the various pulleys…
Belt removal
Removal of the belt is not too bad…
You need to remove the left hand cover around the fascia…but to get to most things that needs to
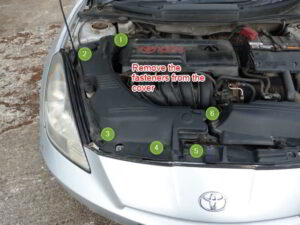
come off…
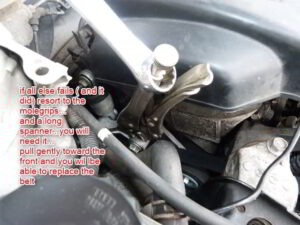
It’s a bit tight down the side but you can get a spanner on the serpenine belt tensioner nut…
But make sure it is a spanner that holds on the flat rather than the corners…
A 19mm is a sloppy fit, an 18mm doesn’t fit and the imperial equivalent doesn’t fit either…
I opted for a 19mm….
I have the long spanner set…not ideal as it acts on the corners but very long and gives you a lot of leverage advantage….
Putting the spanner on the adjuster nut and pulling it towards the front of the car, you will feel the piston compressing slowly…just keep pulling towards the front of the car…
Look at the belt on the alternator pulley and that should become slack…

To the point where you can slide it off…
Gently release the tension on the spanner and i tuck the belt under the alternator pulley to keep it in place…
One thing i forgot to tell you is to make a drawing of the belt run…
I have included one if you don’t get around to it…
The belt can now be slipped off all of the pulleys and removed from the side of the engine…
It is a little bit of faffing but possible…
And you can now spin the tensioner pulley…
Mine span and span and span…sounding like a really dry bearing…
There was a little sideways movement in it but not too much…
Comparing it to the new one the seals had worn, so it really needed replacing….
Remove the tensioner
Now mr.T has excelled himself with this one …
I am sure there are plenty more places where parts have been assembled off the car then inserted…
Bit like the heater matrix…which i have changed through the glovebox opening (it does work)….
The bolt for the tensioner need to come out about three inches…
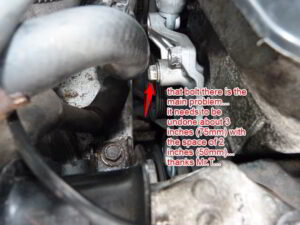
On a Toyota Corolla …no problem as there is plenty of room…
On the Celica however, you are a little tight for space…
So if i say it quickly then you may not laugh too much…
Lift the engine to get the bolt out…
So the sequence…
Remove the under tray…first jacking the car up so you can get under there…
There are bolts and fasteners..
The fasteners should be the ones that you press the middle in and then extract the whole lot…
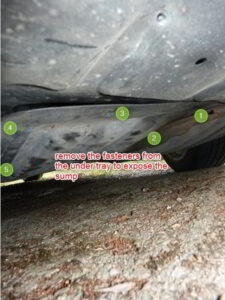
I found that by removing the bolts i could get a trim tool between the chassis and under tray…
And lever them out…
You will need to go searching for them.. i can’t find one of mine…so grabbed one out of the spares bin…
Grabbing a jack and block of wood to place under the sump just take up the tension….
Now up top again…
The engine mount is not held in with two bolts but three….
Yep there is an inaccessible one under the power steering reservoir….
So that needs to come off…two 10 mm bolts …
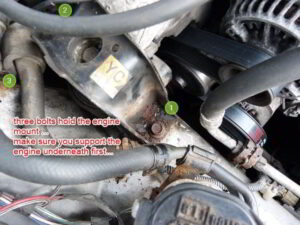
The top one of mine sheared off after turning quite happily a few turns, so keep applying the release spray…but i think it was corroded inside the wing…
The one further down the inner wing came out ok…
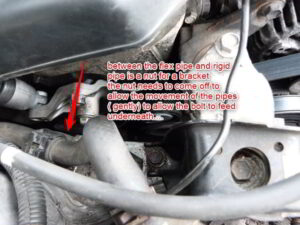
Pushing that out of the way and moving the other flex pipe for the power steering you can get at the third bolt for the engine mount….
Release all three bolts….
And you can move this side of the engine up about two inches…
Not enough to clear the bolt….
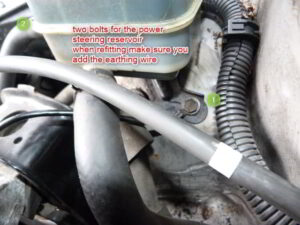
So the two pipes running to the power steering pump need to be released…
Just under where the flexible one has a clamp is a plate that both pipes are attached to…
Remove the nut…
And wiggle the pipes loose …
They won’t move too far as the lower one is a solid pipe with a bit of flexible on either end…
But you should be able to undo the tensioner bolt and feed it under the two pipes and get it out….
I got half way through this and thought…you have got to be kidding me…
I would love to see the service manual times for changing what should be a half hour job…with a tea break…
And don’t forget the nut at the top of the piston…
The tensioner will be able to come out now….
Now three hours later i am spinning the tensioner pulley and thinking , i haven’t replaced it in over five years of ownership…and the nut is a Toyota one …
If it is the original then it has really done well…
Some say you have to take the top engine cover off, but i never did and it all came off…
Now to rewind and put everything back together….
Replacement
The new belt tensioner pulley should rotate smoothly but not just spin…that comes later when it is worn….
So locate the tensioner in place and place the piston end over the protuding bolt…pop the nut on there to keep everything in place…
Feed the bolt under the pipes again back into position and through the tensioner middle hole…
Remember you are threading it into the engine block so don’t go mad with the wrench and strip the threads….
Start it off with your fingers ( you will have no choice ) i ended up using both hands either side of the bolt and spinning it in until it cleared the pipes….
The nut and bolt can be torqued down now…
The pipes fitted back and the nut tightened onto the bracket.
The engine lowered until it is about half inch ( shows my age… 10 mm) above the wing…
You may need to pull and push to get a bolt to line up as the engine and chassis may have swung slightly off kilter…
If you can get the one in partially then fit the other two…
Lower the engine until the mount reaches the wing….
Pulling and pushing as necessary to prevent damage to the threads….
Now tighten the three bolts….
Refit the power steering reservoir….
And the next little job is fitting the belt…..

The way i did it , and i’m not saying this is the easiest way but it worked…
Is to fit it to the power steering pulley at the back …keeping all the rest of the belt to the front…
Feed it around the tensioner pulley and onto the crank pulley….
From the crank pulley to the air con compressor pulley and onto the idler pulley
Now tuck the remaining part between the tensioner and the alternator…
And grab the spanner to pull on the tensioner…
Now if you find it like mine …as soft as sh*t….then the corners round as soon as you put tension on it…
So now what…
You need some serious force on that tensioner to allow enough slack to drop it over the alternator pulley…
I tried spanners, nope .. just a little more metal off…
I tried pipe wrenches nope …too soft again…
In the end it was a pair of molegrips ( vicegrips) that and one of the long spanners on the top gave me enough leverage with a bit of slippage to allow the replacement of the belt….
If you have done it correctly then the belt will be running on all of the major pulleys and over the idler and tensioner…
Press on the top run of the belt to feel the tensioner working.
And check for any stray nuts and bolts…
Run over in your mind the sequence and if necessary put a spanner on the nuts and just make sure.
Remove the jack from under the engine…..
Just check before you start and stop the car quickly…with someone watching the run of the belt…
But all should be good…
Refit the under tray…
And remove the jack allowing access underneath…testing
And that is you sorted…for the next 50k miles…
The Result
The whole idea was for this to remove the noise when the car got up to temp on a longer journey…
Taking it out for a quick run and back…you can imagine what i felt like when…yes the noise had changed , but was still there…..
So now it must be a lack of oil in the air con compressor or worst case the air con clutch bearing….
I really hope it is not the latter as i don’t know about the tensioner nut holding….
Luckily on these cars the timing is done with a timing chain….and fitted for life if you look after it and service it regularly….so there is no timing belt to snap (the demise of my other toyota celica gt)
The chain tensioner take care of any slack, very similar to motorbikes…i am amazed other manufacturers don’t follow this…
So there is not much chance of that snapping…
Oh…just a point.. use the outer wrap the belt came in and put the old one in the boot…just in case….
Even if you can’t fit it if the other one breaks, you know you have a spare and only need to get to somewhere that has an adjustable to move that tensioner again…….
If it does ever snap remember that your water pump is on that belt so only drive to get somewhere safe….
If you do have a go and find an easier way to do it please leave a comment below
I will update after i have recharged the air con and if necessary replaced the air con clutch….
I have heard of people replacing just the pulley, but you need to get that special nut off the pulley first…
You will need to be working with the wheel off and the wheel well inner off to get direct access to the bolt….
I can see why you would go that way , not disturbing the engine mount, but you don’t replace the tensioner piston…and the bolt for that is on the engine side…..
I hope this has given you a better idea of what is involved on replacing the serpentine belt and tensioner on a Toyota Celica VVTi 1.8L GT.
Have fun
phil
Update 1:
The aircon was tested with one of the home kits borrowed from a mate….thanks Matt…
The gauge read zero, so it has been recharged….
After testing on the drive the mag clutch actually pulled in and the air con compressor sounded terrible…..
I took it for a longer run and have decided to take it out of the equation…..
Update 2:
There is another belt sold for the Toyota without air con…
I measured the length with a piece of string and got about hte same length …mine wat 1480mm and the belt sold is 1534mm…at £10 worth a punt…
After getting the belt, my thoughts were, not that adjuster again ( and i have to do it twice….)
I tried various methods , including taking up the slack with an old set of feeler gauges ( this may work if it was brand new and had corners…) but in the end the mole grips were back in action along with the long spanner….
What i found was that in one direction hte end of the jaws hit hte mounting nut boss nad held in place…
So pulling forward i was able to remove hte new belt…
Fitting the shorter belt was a bit more of a pita….
But the same process….
On the waterpump at the rear,with hte slack to hte fornt…
Then over the tensioner pulley and down over the crank…
To come up over the ildler pulley and wait to be put over the alternator…
It is strange not putting the belt over the air con but….
So not having moved the molegrips ( yes you can just get the belt on with them in place…it’s tight but possible)…
Pulling forward, you find that the pipe is in the way, but if you work from behid the pipe and feed it over the alternator pulley it does eventually go…
So it fits and tensions…..
I have run it up the road and it came back quiet.. so yes it is the aircon clutch bearing…
I can now work on it at anytime….after getting to making a locking plate for it….
So if your air con packs up on your Toyota celica 1.8l vti you can use a non standard belt length to remove it from the chain…
Fit a 1538mm belt…
The one i used is a cd6pk1538
Good luck if you do it and leave a comment below if you managed it…
Sign up to be kept up todate.
- what should i do to make money online - September 7, 2022
- Scirocco mk2 k-jetronic fuel system issues - April 21, 2022
- How to fix GHD hair straighteners : SS2 mains connector repair - December 7, 2021