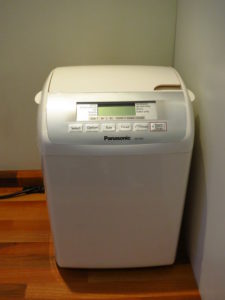
We have been breadmaking for over 15 years and the last 10 with the Panasonic SD255 model
Geoff Pyne flickr
It is the same as the sd254 except it has the nut dispenser.
I think we have used that a couple of times, but it is a ‘nice to have’ item rather than a necessary.
Smaller loaves than normal – no reason
About 12 months ago (April 19) we started experiencing smaller than ususal loaves.

We went through all of the ingredients, blaming the yeast, flour, amount of water, amount of sugar – i’m sure you know the feeling.
But whatever we changed nothing corrected the size of loaf.
When you put it on for a xl loaf and the top only just reaches the top of the bread pan……
I gave up making bread, convincing myself that it was me.
My partner carried on as we still had to have bread – we bake at least two loaves every week…
So more and more dense bread was appearing.
We went right back to basics and it sort of improved, but nowhere near what we used to make…..
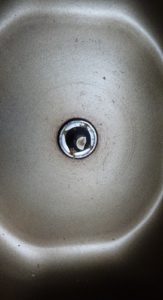
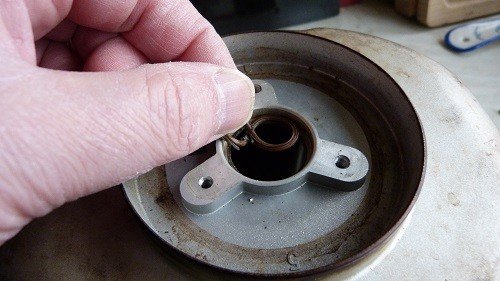
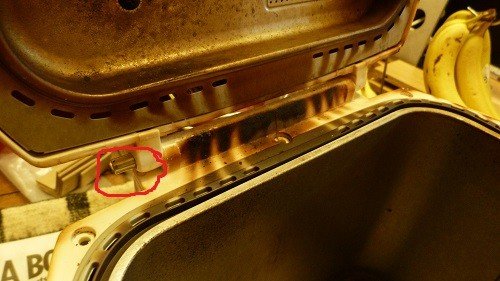
Then one day while washing the pan part of the seal gave up on the shaft for the paddle…..oh no….
New breadmaker time???????
As an engineer i really hate throwing things away so i had a look for spares….
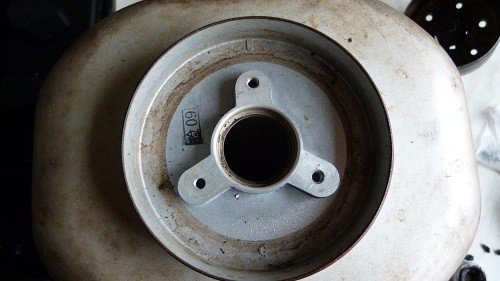
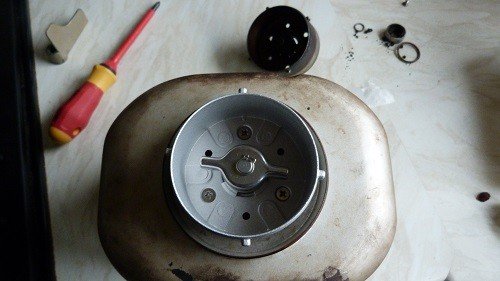
And up popped the whole paddle, seal and pan locating mechanism.
for a reasonable price as well – a lot cheaper than the complete pan…..
The unit arrived so i set to work
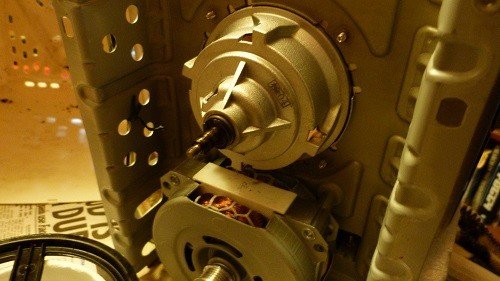
Removal of pan shaft unit
The removal of the unit is relatively easy if the screws move
Just make sure you press down onto a solid surface and have a screwdriver that fits properly and they will come out.
Remember to remove the seal from the aperture left- as you get a new one.
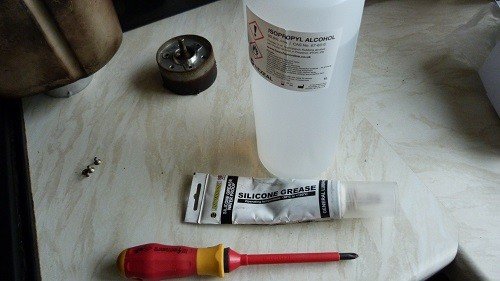
Refitting the pan shaft unit
I used a little silicon grease on the rubber seal to refit it and locate the unit.
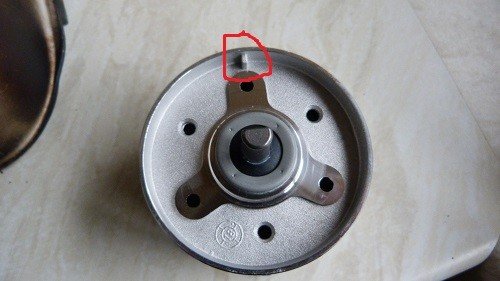
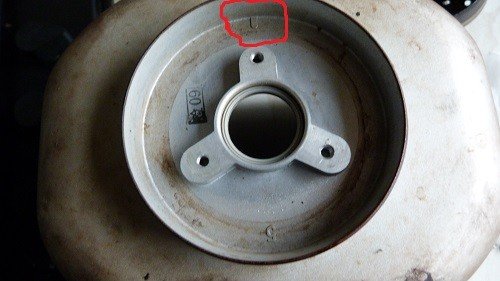
It will only fit in one way around – so make sure you locate the lug in the pan and the space in the unit and fit it correctly.
Screw the screws in tight, but don’t go overboard or you may strip them – remember it is aluminium….
and that’s it….
Results
The next loaf we made we thought ‘at least it still works’
But what a suprise when the loaf was over the top of the pan….
Back to where it used to be.
So if you suffer from small loaves in the panasonic sd255 or sd254 or any breadmaker which is aging- then definitely either replace the pan or replace the unit with the seal for the paddle shaft.
A few months later when making bread we heard a tinkling within the machine
Opening the top the paddle was still going around but strange noises were coming from under the pan….
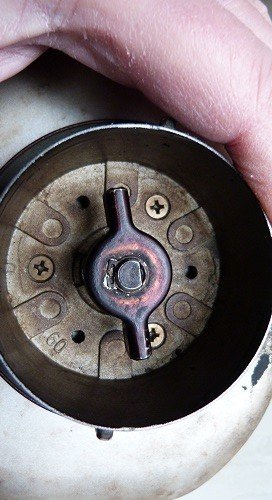
Paddle not turning – brocken coupler
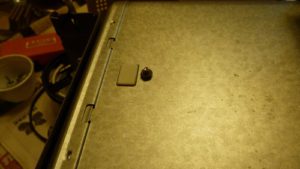
What was seen was a mess…
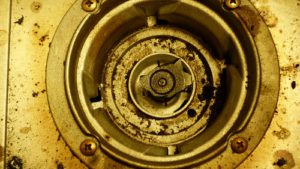
The coupler that picks up to turm the paddle had shattered into little pieces…..
Oh st*t… we needed the loaf the next day….
We had stored an older breadmaker when we bought this one – and loan it out to try to get others to start making bread.
With no success at the moment – it just doesn’t fit with most peoples modern lives..
So we pulled the dough out of the panasonic and got it into the morphy richards and set that going.
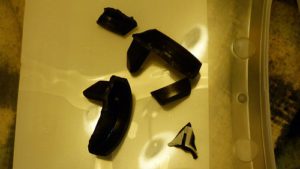
But left in the bottom of the panasonic was a mess and the shattered remains of the coupler…..
Because we had recently renovated the pan and we really like the machine ….
I had no choice but to look for spares…..
And finding a complete unit for the base, a bit pricey, but was an option.
And further investigation showed up jsut the coupler shaft- that’s all we needed…..
So now to strip it down before we order that part to make sure we can do the job…
Panasonic SD255 teardown
I have taken loads of images while stripping this down and i hope that it helps give you the confidence that it is a fairly easy job to do.
The hardest part is the removal of the front electronics unit…..
So lets get started.
Lid removal
I did this a bit out of sequence but i would advise removal of the lid first.
Using a phillips screwdriver – remove the screw from the left hand side of the hinge.
It is a strange looking screw so not easy to mix up with the others…
Carefully push that side of the lid backwards, until that side is clear of the base and then slide the lid off to the right.
and thats the lid removed…

Oven removal
Now to get the oven out….
Turning the base unit over you will see two screws for the mains bracket and four screws – one in each foot.
All six need to be removed.
The mains cable is held in place with a push in clamp.
This needs to be removed to allow the bracket to slide up the cable.
Mains cable clamp removal
To remove the one on my machine – they may have changed it on later models….
I used a flat bladed screwdriver and levered up on the outside until it popped out and came off the cable
It is a wrap around and push fit grommet.
UPDATE : It turns out that there is a connctor under the tap – so it is easier if you remove the tape and undo the two connectors……
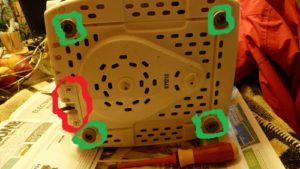
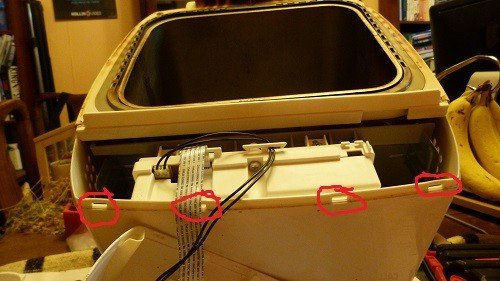
Electronics module removal
This was the most frustrating part of the teardown….
There are five screws on the top of the unit – these need to be removed.
At the rear of the electronics unit are two click locators.
I tried a few times pushing these in with no avail.
In the end i resorted to pulling the pan upwards.
It is easier to start by pushing on the hinge part and that will release the rest.
Once the pan and top starts to come up the electronics will stop it being removed.
What i did was to pull up as far as possible and rotate the electronics unit to the front.
Mine came off all at once – so you need to be a bit careful as there is a ribbon cable and a pair of wires connecting between the electronics unit and the base…
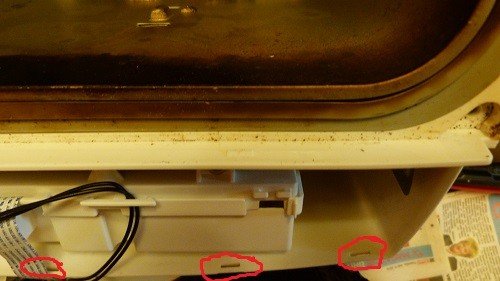
You should be able to push into the holes on the rear of the electronics unit to release it from the rear and rotate it off but i never managed it.
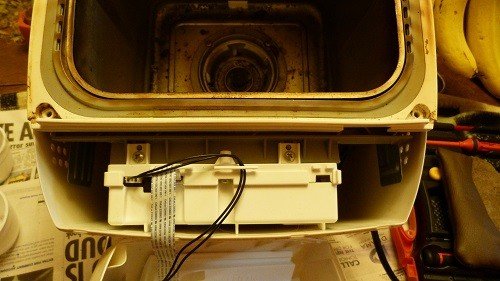
Seperation of oven from base
With the electronics unit loose it is now an easy job to remove the oven assembly from the base.
I relocated the electronics onto the oven assembly to keep it safe from damaging the cabling.
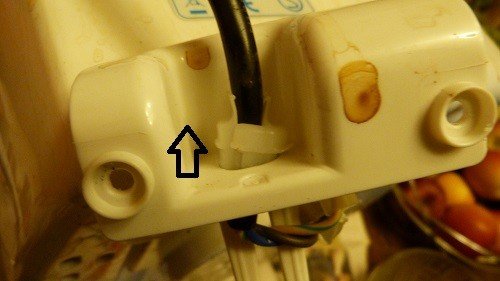
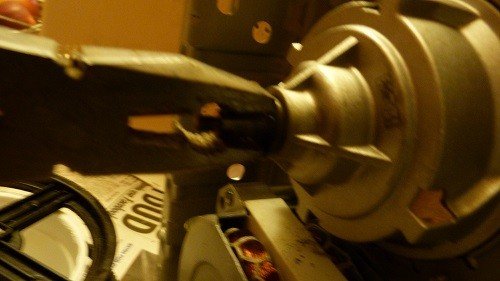
Belt and pulley removal
To remove the coupler shaft you will need to remove the pulley.

To remove the pulley you wil lneed to remove the belt.
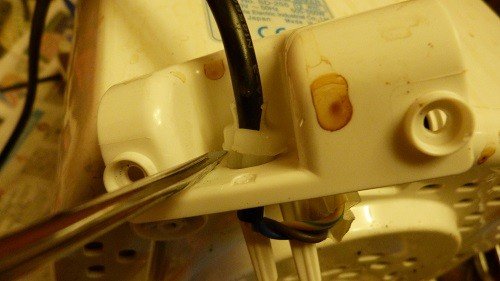
The pulley and motor should still turn – they did on mine.
So while rotating them pull the belt over the lip of the motor pulley and it will come off.
Mine was in very good condition, but it doesn’t cost too much for a replacement …and it is over 10 years old….do you really want to strip it when this breaks next……
Now you can use an 8mm socket or spanner to release the bolt from the pulley.
You should be able to wobble the pulley off the shaft.
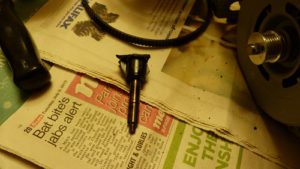
Before the final removal of the shaft you need to remove the circlip
I used a pair of pliers with the top jaws on the circlip and the lower on the shaft – i know purists will start to shout and scream – but it works….
Using a flat screwdriver you can lever it off once loose from the shaft.
There is a washer – very thin – on the shaft which needs removing before….
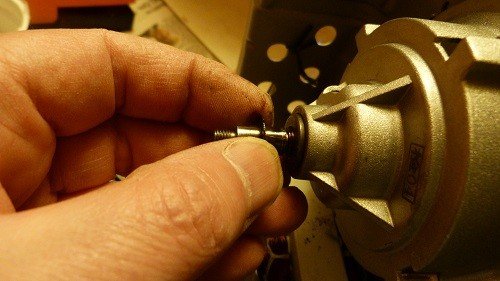
Removing the shaft…..
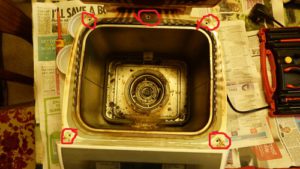
Heater insulator
When on a forum i did see someone ask about replacement of the heater insulator as theirs had broken.
And to replace the heater insulator on a panasonc sd255 you need to strip the unit down as above.
To the point of removing the oven assembly from the base.
Then there is a 6mm nut on the outside of the pan, holding the insulator in place.
Reassembly
Now waiting for the spares, but reassembly will be the reverse of removal.
Except i would locate the pan assembly in the base before putting the electronics unit on.
I would locate it at the front first and rotate it onto the rear locators…
Wrap the mains grommet around the cable and push it into the bracket efore fitting the bracket to the bottom.
What About Where You Store The Bread Machine
we moved up north a bit – to Scotland…
is it cold, windy rainy and snowy…a bit , but no worse than down south where we were…
but the cottage is a granite stone cottage.
and the wall are about a foot and a half thick.
the utility are a where we put the bread machine is not fully heated – so the machine gets cold….
and if you try to make bread with a cold machine there is only one result with the panasonic sd255..
small loaves – really small loaves…
we went through the normal process of diagnosis and even started looking at the machine itself- not really thinking of the storage temperature…
we tried a test of the yeast we were using – a little hot water and a teaspoon of yeast- leave for five minutes and it shouyld be foaming well…this wasn’t happening , so we changed to another batch of yeast…
interestingly yeast can be degraded by heat – so be careful where you store it…
the new batch foamed , but still very small loaves…
and then we tried heating up the water – we are on well water here – so that maybe cooler than mains water…so 20 secs in the microwaves and it was toasty…
the loaves were larger but still small…the tops of the loaves were split open – like it weas still rising when cooking.
unitl one day we brought the whole machine in for a while and left it overnight ..
the next loaf was larger again…
checking the pan temperature – it was cold…
the pan was put on the radiator for a while …and the next loaf created…
compared to the last ones it was huge- over the top of the pan..
the top was nicely domed- no exrta rising…
we have been doing this now for about 6 months – even in the summer uphere the storage is too cold for the yeast..
s oif your loaves are still small even though you have checked the machine – think about where you keep it and see if the pan feels cold- if it does then put it on the radiator or wash it out with hot water before loading up the ingredients to see if tha makes a difference…
the main thing that gave it away was the split in the top of the loaf – like it was still rising …
these machine don’t have an ambient temp sensor to then warm the pan before going through the cycle …
a neighbour bought a more recent one and this does have another temp sensor to detect when it is too cold during the rest period and warms it up – so they have learnt this is a problem…
i hope this helps if you have small loaves with split tops ….
Other repairs on panasonic sd255
I will update this post with any other repairs i carry out on the panasonic unit.
Most will be compatible with the sd255 and sd254 and maybe other panasonic units.
If you have used this guide on another model please leave a comment to allow others to find it….
Many thanks if you do.
And leave a comment if you find that you now have a panasonic unt that works as it used to.
If you have any trouble with the repair give me a shout and i will see what i can do to help
Thanks for reading
Phil
Sign up to be kept up todate.
- what should i do to make money online - September 7, 2022
- Scirocco mk2 k-jetronic fuel system issues - April 21, 2022
- How to fix GHD hair straighteners : SS2 mains connector repair - December 7, 2021
Big thanks for writing up this work. After 11 years of very regular service, the plastic driver plate at the bottom of my sd254 broke. In fact, I had a second hand, as new sd255 waiting to replace it in attic, I’m such a fan of these machines, if only for the form factor compared to later models. Anyway, the machine has been strippped down this morning, with confidence thanks to your blog. Now I know I can get the part out I have ordered a new one. So I think i’ll put the old one back into service and the sd254 back on standby in the attic!
That’s brilliant Dan…these models are very good..
even after repairing ours it is still going strong…
I am pleased that Panasonic made spares and it is esy to strip…after learning how to…
Glad to have helped…
Great instructions … accurate and easy to understand. Thanks!
Glad to have helped Bob…
I hope your machine is back up and running….
Hi Phil, many thanks for posting this! I was faced with the same issue – after many years of hard use the plastic part of the coupler on my Sd-255 had finally given up and splintered into pieces. Managed to strip the bread maker as far as the electronics unit but couldn’t see how to get the blasted thing off without breaking something. I’d just about resigned myself to having to buy a brand new breadmaker when I found your post. It gave me the encouragement to persevere. Works fine again!
Thanks for this Phil, gave me the confidence to attack our ancient SD-254. I was expecting a broken or slipped drive belt but everything looks ok. Baking failed on the last attempt because the paddle hadn’t moved and ingredients weren’t mixed.
The only other suspect I can think of is the motor. Mine spins freely by hand, I expected it to be ‘notchy’ or at least offer some resistance. The pulley also spins freely with the belt removed.
If it’s not the motor it has to be the electronic controls, I think that would be the end of our SD-254…
I’m glad it gave you the confidence to have a go at the repair…
It is a shame it hasn’t helped in your case…
I hope it isn’t the end of your breadmaker as they are wonderful machines…
Phil
Further to my previous post it seems likely that the CB661 motor start capacitor is toast. This is often the culprit for a non existent or weak paddle action apparently.
Hey Rob, I’m glad you had a go at repairing hte electronics…
it is useful to know that hte Capacitor is the likely culprit…
At the moment ours is still going strong…
Hopefully you have got a replacement capacitor …
if not then this one will do the job..
https://www.ebay.co.uk/itm/224544989752?_trkparms=ispr%3D1&hash=item3447eca238:g:4I0AAOSwmbFg-uNP&amdata=enc%3AAQAGAAACwPYe5NmHp%252B2JMhMi7yxGiTJkPrKr5t53CooMSQt2orsSvtkx670Z0mbyfWqmxLFLYYvSi2G11Yx8f3vsXBIjrYxLGBLkA6aVSUPjfY2F0KuKKthQrUE9A6IXfWiSHdPl8hDrmQsRfEZwuKHV8D0DzW8pviMVdmMXudc2Qk7hxEVjgxgWetcRcW03hcdsfyPaulvYkA6N4vbilKlVGd9MWLXI2XM9TA2uxX676xYNYJmpTX2SC7UWU5kb4J%252BU7HglB3Xw78j712cRUZ5uYpBxeVNFmCRu7O4qo95aak%252BnwCda653yRPTbtyYYjU55VTML3u5qxI4o72IWAnCfT7Av7CWZoNCDdwqSNTAM8VwHY5BA0vbutL25PpV4GCNwlKUH3lqhDguSLMsLxu7bi7TxzAWO6ZF31Kt5YNDhqdaUSlM1YJ%252Bgysa%252FIXgkp0ePzgkyWx29wS6vSco4kewt18DvvIRCiLTrXhKhV6r3JmHNCp8M9hyGPjkV3NLg0OMkJA%252BTQH9fcRgPfyBDu7pYJsyS84jK1KP9UDMG5H4%252BC3D99JspKRqeJxX8Q1S%252BdRLR%252FrgFShIKKhKpi92czIXiSgXbKKtXoXJIOfk8q44JYZfCmOePUNNkWuM1ITCAwd9%252BmHUfJrFn6E1xqjDFzlxI3tSFFLbg67ICecKqPNf2jppEB61U1c28iVGwYR2wUC2Q2jThQKr2GTej%252BFZu%252FUK0P0uki9cf%252BTB5ETddCiUd3kKlBQRhXvLHhoMIHT8mNhS8A5DloW72M7IMHVp3T8hWV%252FRU85%252B5KxjdyALd35pisFYaZKeHP0Kv8xJbJII07VYbhWYpQnJip9xvnqJt9tDQiUDjHNl4IPpXc8RWrUdfspteupS0%252FVqT%252Fusut9Dfn9B1G1EyVgp9gg2dtSaRyfO94yWgolMHZOMFa%252F8J2CuUvz5ukv4c%7Cclp%3A2334524%7Ctkp%3ABFBMqPP7grhf
Selecting 3uf
and they are in the UK…
it is not pcb mounted but hopefully you will be able to fit it…
Let me know how you get on Rob…
Brilliant Phil. Our sd255 failed, the paddle was clearly jammed as no mixing. I was about to get a Smeg bread maker but thought that I should try getting inside. My faltering attempts succeeded in freeing the coupler. What came out were quite a lot of burnt bits including some grains but it felt as though the drive belt and motor were still attached. The next loaf worked well. Reading your blog would have been essential had I needed to go further. Many Thanks.
Thanks for the useful instructions. I too hate throwing things away, even after 2000 loaves and 10 years. It’s great that Panasonic supply the lower drive connector at a reasonable price. We followed your strip down and replaced the unit/ Thr breadmaker is now working just fine. Great stuff.
Handy little tips BUT you do NOT have to remove the mains cable grommet to gut the machine. It can be threaded through the outer casing aperature with a little care. I have just changed the motor run capacitor on one of mine and you have to strip right down to the PCB as that is where it is soldered. You need a few tools and plenty of patience.
Thanks for that information Greg – i haven’t had to replace the motor run capacitor yet….