
A while ago my partners vw scirocco mk2 gtx engine started hunting especially on idle…
Years ago i remember it being quite happy in 5th gear travelling at 20 mph…
Now it is down to 4th at 30mph and still jerks with kangaroo juice….
And then another problem started…

You turn the key and it fires and dies instantly…
You do this three or four times and then eventually it will start…
So i had to get my thinking ( or reading) cap on and figure out how this mechanical k-jetronic fuel injection system works…
K-jetronic operation
Now i might miss a little bit here, but there are many cars between 1973 and 1994 that are which are fitted with the Bosch k-jetronic fuel injection system.
You have a good pedigree of manufacturer using it from porsche, bmw, tvr, volkswagon, audi, volvo, lotus, ferarri, nissan, peugeot and ford….so most of them in the day…
The Scirocco mk2 gtx and the golf system are almost identical and work on the same dx engines…
And this system is all mechanical…no central brains like on a modern car…very few electrical parts
Simple you think…
And once you start reading about it…yeah on the outside it looks simple…
Now try to fault find it…..
The basic principle is that there is a lift pump in the fuel tank, this is then fed to the main fuel pump located in front of the off side rear wheel…
This feeds fuel to the metering head, via a fuel filter and excess fuel is returned via a fuel regulator screw…
And there is always pressure in the system…
The injector work off this pressure…and are constantly spraying when the pressure is high enough…hence the name k-jetronic or Kontinuierlich ( continuous) injection
When the engine is cold there is more fuel added to overcome the higher resistance of friction and fuel not vapourizing as well…
To do this you have a few elements in action…
You have a cold start injector…this only squirts a small amount of fuel in at starting of the engine…
You have an air bypass valve ( a bit like opening the throttle a bit or a choke), works on a bimetallic plate heated from the engine and battery…
You have a warm up regulator….this lowers the pressure on the metering head control plunger and allows the sensor plate to lift it more and allows more fuel flow…controlled from the heat of the engine and battery power, again a bimetallic strip…
The fault symptoms
The Scirocco would turn over quite happily and catch on almost the first turn…
Then die within a few seconds…
You would do this again…and again it would die quickly….
And again…
And maybe the fourth time it would catch and stay running, but be very rough and hunting, cycling….revs increasing and reducing periodically…around 1000 to 300 rpm…and seem like it wants to die….
But out on the open road it felt fine….
In town and slow work, it would start jerking with what used to be known as kangaroo juice…bouncing on the slack in the gearbox….
You would have to keep the revs up above 1200 to get any sort of smooth running…
And it would smell rich…
We also had popping in the exhaust on overrun…
I always thought that the popping was a symptom of an air leak into the exhaust at the front…
But i was wrong…it is a symptom of a very rich system allowing unburnt fuel into the exhaust and igniting it in there…
Does it do any damage, it can…
How to start testing the system
I started on the system without reading a full description and understanding it…bit of a mistake, but not fatal…just expensive…
I knew about the auxillary air valve at the back of the mainifold, a right pain to get to…
But had read they do seize and cause problems on starting if they don’t open…
The test of clamping the pipe after startup and the revs dropping didn’t really do that much with the engine hunting as it was…
So i stripped that off….
And it was black inside…
The test is to chuck it in the freezer for a few hours and see if it opens….
Then apply power to the connector and over the next 5 mins it should close…
This allows more air into the system and opens the plate a bit more..hence more fuel when cold…the revs increase at startup and eventually drop back….
So into the freezer and out a few hours later, yes it went into a plastic bag first..
It sort of looked open, but not fully….
So i cleaned it the best i could as it doesn’t come apart easily…and they are getting like rocking horse poo at a reasonable price….
But we decided to buy a second hand one …ebay is your friend…
There are many different ones so check the model number and it is the three last digits that determine the actual characteristics apparently…
There is a repair kit, which is only suitable for certain models…not ours frustratingly…we almost got one…
So new (old) one arrived and i cleaned it up a bit and shoved it in the freezer…
Next day there was more daylight than the original…
So that one was fitted….
No difference in starting….still start, die…start, die…start,run,die…start, run, hunt…if you are lucky carry no, but more times than not die…and then run on the fourth or fifth start…
So i checked the air valve on the suspension turret…
Removed it and checked that applying 12v across the contacts allowed the air through…don’t forget to use a short length of clean pipe to blow through…it tasted horrible…
So that worked…but was not catching the revs as they dropped below 700 rpm as it is supposed to…or if it did then it was not stable…
Again this air valve allows more air through and lifts the plate a little when the revs die below 700 rpm stabilizing the running…
We had had an issue with the vacuum valve feeding the brake booster and the change light and fuel economy gauge…
The two pipes had been snapped off and sort of blocked up…so i did a better job of that…
Those are even more like rocking horse poo…so when working in there be very careful around that….
I am going to try a splitter after the valve so i can replace it with a common one without a branch after the valve…i will keep you updated on that…
So wtf….
Back to reading….
This time i concentrated…
And learned that it is all about the pressure…
I was starting to think that it was the fuel pump relay cutting out ( we have had this before) just after starting…or fuzebox issues ( again we have had this before)…
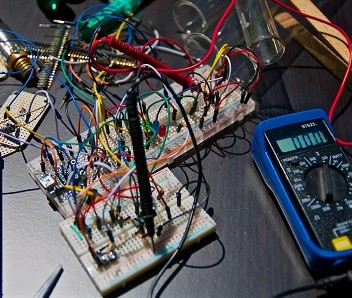
So to troubleshoot this system you need a fuel pressure gauge…and shut off valve…
And one you know that is accurate…
Apparently there are a ton of chinese kits with fuel pressure gauges that are not reliable…they don’t give the same pressure time after time…not really helpful when relying on that…
I read about this in a few places on the net…
So we decided that, not the cheapest solution, but one recommended by a few was a seller in Germany who made a kit for the k-jetronic system…
Ideally you need a fuel gauge that goes over 7 bar (105 psi (ish))…there is going to be a lot of fuel pressure in there to open the injectors…
So at just below a hundred quid ( justification: mechanics time to learn about the system and diagnose the fault 4-5 hours at 45 quid an hour – total 225 quid and car still not fixed)…we now have the fuel pressure gauge…
Troubleshooting the k-jetronic fuel injection system
The pressure gauge arrived with a nice email saying that once you have the pressures and don’t know what to do get in touch and he will diagnose the fault…
He also send through a three page document with the typical pressures you should see….
All very useful and reassuring….
Leaving the car not started for about an hour to relieve some of the pressure, i wrapped a cloth around the union to the warm up regulator from the metering head…
As it sprayed out…it will remove the paint from the metering head, but you car repaint it after you fix the car…
Removing the adapter from the metering head and carefully fitting the banjo with copper washers either side and just tweaking it up…
You follow the pipe down to the warm up regulator and remove it from there…
The other end of the gauge ( with the tap) goes onto here…
I bagged up the ends of the loose pipe to prevent any debris getting in there.. taping them would be just as good, but you don’t want anything getting in there and blocking the fuel system….
This system is good when it works and a pain when it doesn’t…
When starting the car, the fuel pump only activates when the starter is engaged…then a feedback from the ignition keeps the fuel pump relay alive…
So i would have to be cranking the engine to get the pressure…and very quickly flatten the battery…no way…
Solution, remove the fuel pump relay…and …one of two ways…
Either poke a bit of wire between where the main contacts would go…
Or grab a x contact relay (#17 on mine) and insert it in place of the fuel pump relay…
I went with the latter…
So now when i switch on the ignition i hear the whine of the fuel pump…
And the pressure gauge read 4 bar…with the valve open….
So first test is to shut the valve and read what the fuel pump is doing…
Mine was around 5 bar and you can see the needle fluctuating a little with the opening of the return valve…
Alright, so that pressure is ok…
If not then there is a control valve which you can reshim in the metering head…i wasn’t looking forward to that…
But this breaks the system into two….
You have just checked everything from the tank to the metering head and back…so the problem is under the bonnet…
yippee….
Ok so try and start the car and look at the pressure…
It should drop to around 1 bar to get the engine to start….
Mine was up around 3 bar….
So with the reading about the system…the warm up regulator lowers the fuel pressure ( a bypass valve) allowing the same amount of air flow to move the metering head piston further and passing more fuel to the injectors…
Trying to get my head around the fact that you lower the pressure to make the system richer….it was fried…
I wasn’t convinced that it was a problem in the warm up regulator…
And had heard that the injector seals can go leaky…
The injectors on this system have an air shroud, modifying the spray pattern…
The injectors are a push fit into inserts screwed into the inlet…
Air flows from the inlet to these inserts and the injectors are sealed at the top, with slits at the spray end for the air to flow through…
What can happen is the seals can leak and cause a problem with too much unmetered air getting into the system – then the mixture is weak…
You can compensate for this with a mixture screw on the metering head, but that is not the right way to solve it….
I found out that spraying carb cleaner towards the injectors would either do nothing or make the car run better as the carb cleaner is sucked past the injectors…
One thing about carb cleaner is that you shouldn’t get it onto paint…it works like a paint stripper…i now have to repaint the rocker box cover as well as the metering head…
But the idle did clean up when i sprayed it down there…
So could that be the culprit…
We sourced some inserts and seals…watch out here and you need to know which injectors you have…
There are two types and they are not obvious from looking at them when they are still inserted…
One is a 10mm ( newer) and the 12mm ( older) ones….
The upper seals are common….
But the inserts are different…
For the 12mm they come in two parts…an upper metal part and a lower plastic part …with a seal on the plastic part into the manifold.
For the 10mm the insert is a one piece jobby with a rigid washer….
You may be able to just see the top of the insert with a mirror and light…
If it is shiny then it is the 12mm …if it looks plastic then it is 10mm….
Or you can ‘just pop them out’ as i have seen written…
Yeah right…very easy to get to…
I ended up using a pair of molegrips on the upper connection and a small piece of wood between them and the rocker box as a lever…pulling towards the front of the car at the top of the molegrips allowed enough pressure to pop the injector out of #2 cylinder…
I had wiggled them before doing this and i could feel a definite thunk as it went to the sides…that and the spray test was the justification for removing them…
And thee is not enough room to remove the injectors with the fuel pipe still attached…
So two spanners undid the fuel pipe…with the engine off there is no pressure to the injectors…
Removing the injector i could see that the spray end had got choked up and maybe the air slit was not working properly or at all….
The seal had a little debris on the outer surface and the lower seal looked ok…
Is i taped up the open end of the injector to prevent contamination…it is amazing what petrol can remove.. .including sticky for a lot of tapes…i went with ptfe plumbing tape in the end a couple of wraps over the top and then around the thread…
So i can now work on getting the air slits clean…
A 0.05mm feeler gauge did just slide in there…
I wire brushed the end…with a brass wire brush, as this is softer than steel….
I ended up using a bit of cooper shim i had at 0.05mm and cutting a t shape so i could slide it into the air slits…
Definitely don’t use anything hard to get these clean as you really don’t want to damage them…
Now to get the insert out ( at this time i didn’t know there were different sizes)
The top insert is removed with an allen key…a dirty great big one…try 13 or 14mm…
Or as i did a 12mm (largest i had) wrapped with insulation tape…
In the haynes book it had said the torque was very low to insert them, so i baked on them not being seized and a good fit with an allen key would not round them off …
So two times around the allen key and it was pretty tight in there and….it did unscrew…releases breath….
And both the upper and lower came out…
So just try the injector into the new insert and…what…it won’t even go into it…
This is when i found out about the two types being different sizes…
A 10mm allen key fitted quite happily in the top of the newer full plastic insert…
But not the injector i had in my hand…
So i ended up cleaning the old insert and reinserting it and ‘torquing’ it down…
Getting the upper seal off the injector was a laugh….
If you are going to replace it then cut it off….this makes it a lot easier.. .but get ti onto the main shaft so you don’t cause any damage to the seat for the seal…
I did struggle to get it off over the tip of the injector…and wondered whether the new black seals should be used ( probably not in hind site) but once i got it onto the injector ( a tiny bit of silicon grease ( and i mean a tiny bit just to get a film on there) helps it slide over the tip ( red face and grunting…not like any other rubber i know of….)
Eventually i got it into place and measured the diameter…and where it was going into and they should seal….
So partially insert injector and then fit the fuel pipe…make sure you remove all traces of the tape on the injector before you get anywhere near the car…
And just pop it into the insert….yeah right i thought after the hassle of getting it out…but in it popped…amazing…
Now all you have to do is three more….but at least you know what to expect…
I did #1-3 and left #4 for a later day as that one is a right pain to get to….
Removing the pipes from the rocker box does make it a little easier for access…
You don’t need to remove all the pipes, but the two large ones going to the rocker box cover makes the upper pipes more free allowing less bruising to hands and forearms…
So trying to start it again, it was better but still died…
Walk away…
And come back…
It is all pointing to the warm up regulator having either a stuck diaphram or gunged up…
Someone had already got a replacement kit for this and fitted it, they did confess that the diaphram had a couple of little marks on it but they shouldn’t matter…so went ahead and fitted it…
They found that the car was running very rich and had to massively adjust the mixture screw to get it through an mot…
I had found this very odd at the time…
But now even odder….
So with the resting fuel pressure of round 3 bar make sure you cover the union you are loosening to prevent fuel spraying over everything…
The warm up regulator came out…
Located next to the dipstick at the front of the engine it is very easy to round off the allen bolts…especially as the tube for the dipstick gets in the way…
Luckily i had ordered a long set of ball end allen keys to use the 3mm one for the mixture screw….
The 6mm one was so useful in getting past the dipstick tube and with a spanner on the short end to increase the leverage i managed to get both screws out without mangling them….
Remove the power connection to the WUR before you try to get it out …
The fuel leads can stay connected as you feed it through…
There is a mod you can do to the WUR to make it adjustable and they did this for racing…
You drill and tap the pin inserted for the bimetallic strip and fit a nut to lock it…
You are able to lower the height of the bimetallc strip to lower the fuel pressure and thereby richen the mixture…
But go too far and you need to strip the back off to tap it out again…
I elected not to do this…
And stripped it down after releasing the fuel into a cloth…
Whatever you do don’t place a cloth with fuel on it onto the radiator fan mounting…
It being painted takes up the impression of the cloth…yet another thing that needs painting…
So WUR in hand….
Remove the four screws…
But be careful as there is a spring inside pressing on the rear…
Make sure it is relatively clean before you do this and the hole at the rear is not blocked….
These come in a few different flavours, some even had vacuum pipes fitted to adjust the pressure…
On the Scirocco it is the basic model….
So four screws out of the rear and the cover will come off…
The spring onto the tophat ( that’s what i call it anyway…looks like one) and onto the bi metallic strip will probably fall out..
There is a pin under the top hat which goes down onto the middle of a circular part at the front…
This pin is the bit that controls the fuel flow through the WUR…
Undo the nut fro the bimetallic strip and remove the nut, spring washer and plain washer.. remember the order…
Then remove the bimetallic strip ( or at least rotate it as there re connections to a resistor wrapped around the strip…this is the bit that heats the strip and closes the valve even if the engine is not up to temperature make sure you don’t break these…)
Now you can see the black plastic housing covering the diaphram…
Four screws remove this and be very …and i mean very careful …with the metal diaphram…and don’t lose the pressure pad…it is small but necessary…
You don’t want to crease or bend this or get any dents in it….
Otherwise it will not work again…
But the initial problem of the pressure being too high at startup was indicating that there was a blockage or a faulty warm up regulator…
Again be very careful just buying another one as they are sort of matched to the car type and have different characteristics…
I saw a manual that had the pressure charts for 8 different types of these on the same model of car….so make sure you get the last digits correct….
Now that the diaphram is off then you can see the middle pipe and the outer ring…
The metal diaphram is pushed against the middle pipe and outer ring, closing off flow.
So the bimetallic strip is holding against the spring until it warms and then it relaxes towards the front closing the regulator valve…
You will see in the input ( the largest hole at the front) there are filter meshes…
I didn’t remove these and this was a mistake that cost me a day…
Apparently the way to remove them is to poke something blunt ( back of a drill bit) down the outer hole at the rear under where the diaphram was…
This way you are pushing them off rather than trying to pick them out…
Be careful as there should be about five layers…each with a different size mesh to trap finer and finer particles….
These can get blocked over time…
I did strip and rebuild this a few times before i got it right…
The time before last the starting pressure got up to 5 bar and it really didn’t want to start…
Stripping the WUR off for the nteenth time i grabbed the carb and fuel injector cleaner and sprayed it into the filter….keeping well away from the car as i did it…
When rebuilding the WUR make sure everything is clean…
And there is no dirt on the diaphragm or left on the surfaces that it is going to seal on…
Then place the plastic cover with the pressure pad and tighten the screws….
The bimetallic strip goes back on next…with the plain washer, spring washer and nut…
Hold the strip so the hole is over the pressure pad…
The pin goes in next and the top hat…so the pin goes down to the top of the tophat…you might want to renew the grease in there…
The spring goes on top and the lid follows …making sure the spring locates into the recess in the lid…
And the four screws tighten it…
Then you can mount the fuel connections again…
You don’t need to mount it for testing ..or have the power connection as this gives you more time at the richer state or lower fuel pressure…
So now try again and starting pressure did drop to less than a bar…
And the car did start cleanly…
And i did breathe a sigh of relief…
And the fuel pressure did build a bit….
But i needed to place the WUR back in place on the car with power connection to see this…
Lessons learned
Don’t buy a vw scirocco mk2 with fuel injection….lol…
They are not that problematic…
We have owned the car for over 25 years and this has been a learning experience for me .. .
I have never touched the fuel system before.. .so they are pretty reliable…
I readjusted the mixture screw next to the metering head so that the idle was not hunting..
As i didn’t get the co meter out ( we have had issues starting to come for a couple of years…even failing the co level one year at mot – so we got a gunson co meter) i went for clean idling and peak revs…
I had to adjust the idle screw at the back of the inlet manifold to reduce the revs as i turned the mixture screw clockwise to reduce the richness….
Once it went over the peak i turned it back a bit and left it…
So lessons for this type of system…
Get a fuel pressure gauge.. without it you are sticking a wet finger in the air and saying ‘it is faulty’…
You can’t tell which part is wrong without a gauge…
Yes you can check the auxillary air valve, the idle air valve, the various resistors on the thermo parts….
But to actually fault find logically you need the pressure gauge and shut off valve…
So if you are suffering form any of the symptoms at the start …
The hunting, the stalling on startup but eventually running, the lack of low speed performance now….
Beg, borrow or steal( preferably one of the first two) a fuel gauge and see what the pressures are doing…and write them down as you check them….you will forget ( i did a few times and had to wait till the system settled before checking them…)
I hope this has been useful, if not entertaining for those who have already gone through this….
If i have missed anything or if it is wrong please leave me a comment below as it has been a few weeks since i have carried out the repairs…
For your interest the person on ebay who we got the pressure gauge and the repair kit for the WUR is called missing parts…based in Germany he will ship worldwide https://www.ebay.co.uk/str/missingpartsde
Talk to him if you need help with your fuel system …he knows it inside and out and has many repair kits….and the vital gauge….
So now i can talk with a little authority on the k-jetronic fuel injection system, including the spray modification on the injectors….
Another knowledge are a on the vw scirocco i have left to others until now….
Thanks for reading
phil
Sign up to be kept up todate.
- what should i do to make money online - September 7, 2022
- Scirocco mk2 k-jetronic fuel system issues - April 21, 2022
- How to fix GHD hair straighteners : SS2 mains connector repair - December 7, 2021